Rabu, 28 Desember 2011

MINI OREO CHEESECAKES

I've made these little gems many, many times, and I've never had a single crack in any of them and they go together in a snap. They are absolutely delicious and totally addicting. 

The only "extra" step, is that they really need to sit in the fridge overnight after baking (to soften the cookie crust), but this step is WELL WORTH IT. You can eat them as soon as they are chilled, but the cookie will still be crunchy.  If you let them sit in the fridge overnight, the cookie almost becomes part of the cheesecake...scrumptious.


24 Oreo cookies (divided)
1 pound of cream cheese (room temperature)
1/2  cup granulated sugar
1/2  cup sour cream
2  large eggs (lightly beaten)
1 teaspoon vanilla extract

Place 6 (original) Oreo cookies in the food processor and process into fine crumbs (set aside). Preheat your oven to 275 F and put 18 cupcake papers in your cupcake pan. Place a whole Oreo cookie in the base of each cupcake paper and set aside.

With your electric mixer (I used my stand mixer with a paddle attachment), mix the cream cheese on medium speed for three minutes.  Add the sugar and vanilla and mix for another 2 minutes on medium speed, or until very smooth. Add the lightly beaten eggs and mix on LOW until well combined. Fold in the sour cream and cookie crumbs with a spatula.

Fill the cupcake papers almost to the top (I used an ice cream scoop and it seemed to be the perfect measurement). Bake in preheated 275° oven for 30 minutes.

Once they are baked, leave them in the cupcake pan and immediately put them in the fridge. Chill overnight.  Delicious !!!


Selasa, 20 Desember 2011

SPICED OATMEAL-CRAISIN COOKIES

We have all tried a LOT of oatmeal cookie recipes, some thick and heavy, some thin and crunchy, some bland and doughy. This cookie, however, is everything those "other" cookies weren't; it is tender, chewy, buttery, mildly spiced and they make your kitchen smell heavenly while baking; it is the perfect holiday cookie!!   


1/2 cup butter (room temperature)
1/2 cup butter flavored Crisco (important)
1 cup brown sugar (I like to use dark, but light works well also)
1/2 cup granulated sugar
2 eggs
1 teaspoon vanilla
1½ cups flour
1 teaspoon baking soda
1 teaspoon cinnamon
1/2 teaspoon ground cloves
1/2 teaspoon salt
3 cups quick cooking oats
1½ cups craisins (or raisins)

Cream together the butter, brown sugar, white sugar, vanilla, eggs and butter flavored Crisco (the combo is MUCH better in texture and taste than if you use all butter).

Combine the flour, baking soda, cinnamon, cloves and salt, then mix into the creamed mixture. Stir in the oats and craisins (I do all of this in my big stand mixer).

Roll into balls about the size of a small walnut and bake on ungreased cookie sheet (do not flatten) for 10 to 12 minutes (my oven takes 11 minutes) don't over cook. Let them cool for about 30 seconds before removing them from the cookie sheet.

Store in airtight container. Makes about 5 dozen.

Rabu, 30 November 2011

PEANUT BUTTER BROWNIES (and a question)

These quick, easy, moist, fudgy, addictive peanut butter brownies are the perfect accompaniment to a big glass of cold milk.
1/2 cup creamy peanut butter
1/3 cup butter, room temperature
2/3 cup granulated sugar
1/2 cup brown sugar (packed)
2 eggs
1 teaspoon vanilla extract
1 cup all purpose flour
1 teaspoon baking powder
1/4 teaspoon salt
1/2 cup miniature chocolate chips

Cream the peanut butter and butter together; beat in the sugars, eggs and vanilla until well combined. Mix in the flour, baking powder and salt until well mixed, then fold in the miniature chocolate chips. Spread into a 9" x 9" greased baking dish.

Bake in preheated 350 oven for about 30 minutes, but start checking for doneness (toothpick test) at 25 minutes. They will be done when the top springs back a little, don't over bake.

I can't believe that  it is time to start thinking about Christmas baking!! It is my favorite time of year, when I can bake with wild abandon and it all goes into the freezer for holiday cookie boxes.  Do YOU give cookie boxes as gifts? How do you present the cookies? I usually just put my baked goods in a decorated large foil pan, but I'm looking for something a little different this year...maybe more festive? Any ideas?

Senin, 28 November 2011

STOVE-TOP TO OVEN BABY BACK RIBS

Shelby, over at The Life & Loves of Grumpy's Honeybunch, posted this "recipe" recently. It is more of a cooking technique than a recipe, but never-the-less, it is fantastic and so much fun to bring the tastes of summer indoors during the winter!!! Shelby has such good recipes over there, I hope you will visit her page.

This isn't the best photograph, but the ribs QUICKLY disappeared before I realized I needed a better photo, so this will have to do for now.  Let's just say that the ribs went from the above condition, to the condition in the next picture in record time.

Start with a 2 to 3 pound section of baby back pork ribs and cut them into three sections. I buy the more meaty baby back ribs, so I think next time I'll cut them into even smaller sections.

Put the sections in a large deep pot and cover with water. Shelby said to salt and pepper the ribs, but I added a full tablespoon of salt and a ½ teaspoon of black pepper directly to the water.
Bring everything to a boil and then reduce to a "high simmer" (not a full boil) for an hour, then drain.

While the ribs are simmering, cover a baking sheet (that has a lip) with foil and spray it with vegetable spray. This will be a huge help in cleanup.

Place the boiled ribs bone side up first and cover with a thick layer of your favorite barbecue sauce. Shelby recommends Sweet Baby Rays and I totally agree.  Broil in a PREHEATED broiler, on high, for 5  minutes.

Remove from oven and flip the ribs over so the meaty side is up. Apply another thick layer of barbecue sauce and put back under the broiler for another five minutes or until the sauce is bubbly and just starting to crisp up (watch it because it will burn quickly if left under the broiler too long).

Remove and serve immediately....with LOTS of napkins!!!   Delicious, thanks Shelby.

Rabu, 23 November 2011

COCONUT CREAM PUDDING

This is a wonderful "last minute dessert" that uses every day pantry items and holds up very well in the fridge for a couple of days, if need be. The wonderfully sweet, rich (but mellow) coconut flavor comes from adding the coconut during the first stages of cooking this pudding.  Even Picky-picky hubby loves this dessert !!

4 tablespoons granulated sugar
2 tablespoons corn starch
1/4 teaspoon salt
2 cups milk ( 2% is ok)
1/2 cup sweetened shredded coconut
2 egg YOLKS (just the yolks)
1 tablespoon butter
1 teaspoon vanilla extract

In a heavy saucepan, mix the sugar, cornstarch, salt , coconut and milk. Cook and stir over medium heat until the mixture gets THICK and bubbly. Turn heat down a little (to medium simmer) and cook (and stir) for 2 minutes. In the meantime, put the 2 egg yolks (yolks only) in a small bowl and set aside.

Remove pan from heat  (but leave the burner on) and temper the egg yolks.  To do this, slowly dribble about a cup of the hot mixture (while you whisk like crazy) into 2 beaten egg yolks.  Once you've whisked in about a cup of the hot mixture, put it all back into the saucepan, stir well and put back on the heat and cook for one more minute.

Remove from heat, add 1 tablespoon of butter and 1 teaspoon of vanilla and stir well.

Pour into dessert dishes (or serve family style in a larger dessert bowl). Chill for a couple of hours, (I like to eat it warm).  Either way, top it with sweetened whipped cream and toasted coconut.

NOTE: Toast the coconut in a dry saute pan, over medium heat until it is golden brown (when it cools it will  be a little crunchy and almost taste like coconut candy). Watch it very carefully, the coconut burns easily!!

NOTE:  This recipe doubles well.

Jumat, 18 November 2011

BROWN AND SERVE DINNER ROLLS

This recipe is just in time for the holidays and could not be easier. The dough goes together in the stand mixer (or bread machine) and only has to raise once. PARTIALLY bake the rolls (for about 10 minutes) then freeze them for later use.

When it's time for dinner, pop them into the oven and finish baking them (no need to defrost). You'll know they are done when they turn golden.

This technique insures great FRESH yeast rolls at ALL dinners. It is also a HUGE TIME SAVING RECIPE during busy holidays; it makes a dozen rolls. As "Empty Nesters" it is nice to be able to bake just two or three rolls.


2 cups all purpose flour (divided) (see note)
1 envelope dry active yeast (I use 1 tablespoon)
2 tablespoons sugar
1/2 teaspoon salt
1/2 cup milk
1/4 cup water
2 tablespoons butter

Mix 3/4 cup flour, yeast, sugar and salt in the bowl of your stand mixer.  Heat the milk, water and butter in the microwave for about 30 seconds, or just until it is "baby bottle warm". Add it to the flour mixture and beat with mixer for 2 minutes.

Add another 1/4 cup of flour and beat on high for another 2 minutes. Stir in enough of the remaining flour to make a soft dough.

NOTE: This recipe calls for 2 cups flour (total), but it takes me 2+ 1/2 cups. Since the moisture content of flour is always different (brand to brand and climate to climate), I suggest that you put in the 2 original cups of flour and then see how the dough looks. If it's still very sticky, add a little more flour.

Knead the dough (with dough hook or by hand) for about 8 minutes; at the end of 8 minutes, the dough should come away from the sides of the bowl cleanly.

Cover with plastic and let it rest for 10 minutes.  Divide dough into 12 pieces and shape into balls.  Place in greased cupcake pans. Mist the top of the rolls with vegetable spray and cover loosely with plastic. Let rise until double (this dough rises very quickly and it only takes mine 30 minutes to rise).

Bake at 375 for 16 to 20 minutes (if you are going to eat them right away)or until golden brown. If you are going to freeze them as Brown and Serve Rolls, only bake them half way; cool then freeze.

Just before you serve these rolls, and while they are still hot, brush with butter.

Kamis, 17 November 2011

APPLE SNACK CAKE

Many years ago, "snack cakes" were all the rage. They were quick to fix, usually rich flavored, moist and dense little cakes and they were almost always baked in an 8" x 8" or 9" x 9" pan. They were perfect for... "snacking!!"

This snack cake is over the top delicious. Three whole apples are packed into this cake, so you can imagine how moist it is.  On day two (if there is any left) it is twice as moist!!


½ cup butter (room temperature)
1 cup sugar
1 egg
3 medium apples, chopped
½ cup chopped walnuts
1 cup flour
¼ teaspoon salt
½ teaspoon baking powder
½ teaspoon baking soda
1 teaspoon cinnamon
¼ teaspoon nutmeg
1 teaspoon vanilla

Grease a 9" x 9" baking pan and preheat your oven to 350.

Cream butter and sugar, then add egg and vanilla and beat until fluffy, add the flour, salt, baking powder, baking soda, cinnamon and nutmeg and beat until smooth. Fold in apples and walnuts.


Mix (by hand) just until everything is well combined. Bake 35 to 45 minutes or until toothpick tests clean (my oven took 43 minutes).  Frost with simple vanilla glaze if you like (but it isn't necessary).

 
NOTE: Use any good baking apple, I like to use Granny Smiths.

Rabu, 16 November 2011

CLASSIC FRENCH TOAST


Today is our 41st Anniversary; actually, we've been together 46 years (we were high school sweethearts). If you follow my recipe blog, you know that I call him "Picky-picky husband" (because he is very timid when it comes to trying ANY new recipes); but he is a GREAT guy and we are more in love today than ever.

~~~~~~~
This is a recipe for basic French toast. Everyone seems to have their own recipe and there are a million variations, but this is a post for the beginning cook, complete with a few tips I've learned over the years.

 
First of all, a tip about the kind of bread you need.
1. ANY bread will work, but SOME breads make a much better French toast than others.

2. Fresh, soft bread makes the worst French toast; day old (or even week old) bread works better.

3. Thicker bread makes better French toast than thinner bread. 

4. Sweet bread like Texas toast works well, as do semi-stale cinnamon rolls (sliced)  and of course raisin bread, (so keep an open mind when thinking about bread choices)!!

4 large eggs
1/4 cup heavy cream
1 teaspoon vanilla
¼ teaspoon cinnamon
dash nutmeg (optional)

Whisk all of the above until very well mixed.  I like to use my immersion blender to do this.  Dip the bread into the mixture and let it sit for 10 or 15 seconds (longer if the bread is extra dry) then lift out and cook on preheated (and buttered) frying pan (I get the best results from my electric frying pan). Cook until the French toast is golden brown on both sides.

Serve immediately with butter and HOT maple syrup.

NOTE: You can use milk instead of cream, but the cream gives a richer taste and helps the French toast get that golden "crust".

Senin, 14 November 2011

CHERRY-ALMOND COFFEE CAKE

A lot of us have company over the holidays and it is always nice to having something tasty to serve with coffee or tea. This recipe is not only pretty, but would be wonderful for company of all ages.  Picky-picky hubby loves cherry, so I made this with cherry pie filling, but ANY pie filling would work well.


This cake is moist, rich and "holiday perfect" !!

2 cups flour
1 teaspoon baking powder
1 teaspoon baking soda
½ teaspoon salt
½ cup butter room temperature
½ cup sliced almonds
1 cup sugar
2 eggs
1 teaspoon vanilla
½ teaspoon almond extract
1 cup sour cream
1 (14 oz) can cherry pie filling (see note)

Grease a 9” spring form bundt pan. Beat butter till creamy, add sugar and beat until fluffy. Add eggs, one at a time, add extracts and sour cream, mix well. Add dry ingredients and beat until smooth. Spread half of batter into prepared pan. Top with half of pie filling (see important note below) and half of the almonds. Spoon remaining batter into pan and spread out. Top with the remaining pie filling and almonds.

Bake at 350° preheated oven for 45-60 minutes (my oven takes 52 minutes). Test with toothpick to make sure its done. Sprinkle with powdered sugar or drizzle with a vanilla glaze.

NOTE: Recipe says to use a whole can of pie filling, but I use the whole cherries in the pie filling and only about ¾ of the “goo”.

Jumat, 11 November 2011

CLASSIC SPLIT PEA SOUP

We have lots of snow and it was five below zero a couple nights ago. That can only mean one thing; it is hot soup season!! I love having a pot of soup on the stove (or in the slow cooker) all weekend.  This is a great classic recipe for split pea soup; it is  quick, easy, packed with flavor and one of our favorite soups.
¾ pound smoked ham, cubed
1 cup onion chopped (I like Vidalia or sweet onions)
1 cup chopped celery
1 cup chopped carrot
1 pound dried split peas (rinsed)
2 quarts chicken stock
2 medium potatoes, peeled and chopped
2 teaspoons salt (see important note below)
¼ teaspoon black pepper
1 cup cream (or half and half)

In a large stock pot, saute onion, celery and carrots together in a tablespoon of vegetable (or canola) oil for a few minutes (they don't have to be cooked all the way through).

Add the split peas, chicken stock, potatoes, ham, salt and pepper. Bring to a boil, reduce heat and simmer slowly (covered) for about an hour or until the peas are very soft (stir occasionally).

Now you have to process the soup in a food processor or blender (stick blenders don't work very well for this), so work in small batches, processing the soup until very smooth and thick.

Return the soup to the stock pot and add the cream (or half and half). Stir well and reheat , but don't boil.  When you serve it, top it with some crisp fried bacon (optional). I like to decorate each bowl with a rolled up slice of bacon (looks like a "bacon rose" lol).
NOTE: Don't automatically add the 2 teaspoons of salt before you consider the following.  If you are using home made chicken stock that has not been salted, go ahead and use the 2 teaspoons of salt.

If you are using a soup base, like McCormicks soup base (a fantastic product), well it has salt in it (but not as much salt as bullion).

If you use this, I would use only ½ to 1 teaspoon of salt.  If you are using regular bullion, leave the salt out all together and taste the soup just before serving to check for salt content.

Selasa, 08 November 2011

EASY ENGLISH MUFFINS

I have always loved English muffins; I love all of the nooks and crannies that hold creamy butter and jam or a dab of melting peanut butter. They are very easy to make and they make wonderful breakfast sandwiches (they freeze well too!!).
2 packets dry active yeast (I use 2 tablespoons)
½ cup warm water
½ cup warm milk
¼ cup canola oil
1 egg
3 tablespoons honey
2 cups all purpose flour
1 whole wheat flour
1 cup raisins
1 teaspoon salt

Mix the flours, salt and raisins together and set aside. Whisk the egg into the cold milk and then add the water, oil  and honey. Warm this mixture in the microwave for a few seconds to take the chill off (bring it to the same temperature you would for a babies bottle). Stir in yeast and let it sit for about 5 minutes.

Pour this mixture into a stand mixer (can be done by hand also) and add the dry ingredients. Knead this dough for about 5 minutes or until the dough comes away from the sides of the bowl cleanly. Cover with plastic wrap and let it sit in a warm place for an hour. Dough should double in size.
Turn dough out onto counter (I do not flour the counter) and roll to ½” thickness. Cut muffins with a 4” cutter (or drinking glass). Place each muffin on a square of wax paper to rise. This will help you transfer the muffins to the frying pan. Let the muffins raise for an hour before you cook them.
The muffins are cooked on a DRY electric frying pan (no grease) or a cast iron skillet. The recipe does not say specifically what temperature to cook them at, it just says medium low for 7 minutes each side. I have found that they cook nicely at 300° on my electric griddle. Serve warm right from the frying pan or  cool on a wire rack and then slice in half and toast.
NOTE: Since everyone’s frying pan and stove temperatures are different, I suggest you try a single muffin and see how quickly it browns before you cook the whole batch.
NOTE: Hold onto the edges of the wax paper square as you gently lift the raw muffin from the counter. Turn the muffin over and gently peel of the wax paper and gently lay the raw muffin on the griddle.

NOTE: Do not grease the frying pan, they will NOT stick. If you are worried about it, or if you don't have a good non-stick pan, you can use a light sprinkle of corn meal on the cooking surface.

Kamis, 03 November 2011

PECAN PIE BARS

Picky-picky Hubby says these pecan pie bars are totally addictive. They have a buttery shortbread crust and a nutty (and slightly gooey) baked topping with a great pecan pie taste.

I have to admit that my budget doesn't allow pecans right now (they are almost $10 for a 2 cup bag!!), so I use walnuts, but they are ever so tasty just the same!! I am planning on adding these to my Christmas cookie trays (I'll splurge on pecans for Christmas though).

CRUST
2 cups all purpose flour
1/3 cup sugar
¼ teaspoon salt
2/3 cup butter (room temperature)

Mix the above crust ingredients and press into a 9" x 13" baking dish (see note below about greasing pan). This mixture will seem crumbly, but don't worry about that. Just pat it evenly into the pan.  Bake in preheated 350 oven for 20 minutes. While the crust is baking, mix up the topping:

TOPPING
3 eggs well beaten
1 cup light corn syrup (like Karo syrup)
½ cup granulated sugar
½ cup brown sugar
2 tablespoons melted butter
1 teaspoon vanilla
1 + 2/3 cup chopped pecans (toasted a little)

Mix well and pour over partially baked crust, making sure the nuts are evenly spread. Return to the 350 degree oven and bake for 25 more minutes.
Cool completely in pan before cutting.

NOTE:  The pecan pie bar crust does not stick to the pan, but around the edges of the topping, it does tend to stick. To combat that, I lined my 9" x 13" glass dish with foil. I didn't grease the bottom, but I greased the sides of the foil a little (the new Reynolds Easy Release foil would be good for this). 

Also, let the foil ends hand over the edges of the baking dish a little bit so you can grab the foil "tails" and lift the baked (and cooled) bars out of the pan for easier cutting.

When the bars are completely cool, just lift the whole thing out of the pan and onto a cutting board.They are rich, so cut the bars small.

Senin, 31 Oktober 2011

APPLE CRISP FOR TWO

Click on photo
I call this apple crisp for two, although I guess that is a bit of a misnomer. It actually makes 3 large desserts (like the above photo), so in my warped sense of proportions, it is apple crisp for two (and a little more for later) haha.  This can easily be doubled (just bake it a little longer).

I love a good fruit crisp. I like the topping slightly crunchy (but not HARD crunchy) and I like it to have lots of gooey filling. This is one of the best crisps we've tried in years.

2 large Granny Smith apples (see note)
¼ cup granulated sugar
¼ cup brown sugar
1 tablespoon all purpose flour
¼ teaspoon cinnamon
pinch of nutmeg (optional)

Peel, core and thinly slice the apples. Toss with the above ingredients and place in a greased baking dish (I use a 9" x 5" loaf pan). Sprinkle two tablespoons of water over the filling. NOTE: Don't mix the water into the above mixture, just sprinkle it evenly OVER the filling; trust me it works perfectly and makes the BEST sauce.

For the topping, mix
¼ cup quick oats
¼ cup all purpose flour
¼ cup brown sugar
1/8 teaspoon baking soda
1/8 teaspoon baking powder
2 tablespoons melted butter

Use a spoon and mix the topping ingredients until everything seems coated with butter. Evenly sprinkle it over the fruit filling. Bake in pre-heated 350 oven for 30-35 minutes or until apples are tender.  Let cool 15 minutes before serving (if you can wait that long).


NOTE: Make sure you use a good baking apple like Granny Smith. Regular eating apples don't work well in this kind of recipe (they get mushy).

NOTE: If you want to make dessert for 6, just double the recipe and cook for 45 minutes in an 8" x 8" pan.

Kamis, 27 Oktober 2011

WEEKEND BREAKFAST PIZZA

I don't buy refrigerator ("whomp tube") biscuits very often, but I DO buy them for this recipe. My family absolutely loves this quick and easy breakfast. As a matter of fact, the first time I made this, I was told "this is gold!!"  Even Picky-picky Hubby gave double thumbs up which is rare!!
 

This weekend treat can easily be "tweaked" to suit your family. Here are the basic ingredients:

8 ounce Pillsbury refrigerated crescent rolls
1 pound (total) cooked breakfast meat (see  note)
1½ cups frozen shredded hash browns (thawed)
1½ cups shredded cheddar
4 eggs  (don't be tempted to add more)
¼ cup milk
¼ teaspoon black pepper
¼ cup Parmesan cheese

Open the refrigerator rolls and press into an ungreased 12" pizza pan, pinching all of the seams shut. Important: make sure you press some of the dough up onto the sides of the pan to create a "lip". DO NOT PRE-BAKE THE CRUST.

Cook (and completely drain) one pound of your favorite breakfast meat (NOTE: I used equal parts of crisp bacon, breakfast sausage and finely diced ham...but ANY combo will work well. Just make sure the total weight is about a pound).

Sprinkle the cooked breakfast meat, evenly, over the unbaked crescent dough. Next, evenly sprinkle the thawed hash browns and cheddar cheese over the cooked meat.

In small bowl, whisk the 4 eggs, black pepper and milk together. Drizzle evenly over everything.  NOTE: Don't be tempted to add more eggs. It is going to SEEM like it isn't enough, but trust me...it is perfect.
 

Lastly, sprinkle the Parmesan cheese over all.  Bake in a 375 pre-heated oven for 30 minutes (my oven took 28 minutes). Remove from oven and let sit for 5 minutes before you cut it.

 
Sauteed mushrooms, peppers, etc. would be wonderful in this breakfast pizza. Just add them the same time as the thawed hash browns. You might have to add a couple extra minutes to the total baking time if you add a LOT of extra veggies.

NOTE: You can also use one of those small boxes of JIFFY pizza crust mix instead of the crescent roll dough.

NOTE: If you use frozen hash browns, make sure they are thawed before using in this recipe.

Selasa, 25 Oktober 2011

STRAWBERRY FROSTING

This quick and easy strawberry frosting is just delightful. I used fresh strawberries, but I see no reason why frozen (thawed) strawberries wouldn't work.  It has a light, fresh, fruity flavor and was a big hit at my house.
1 cup UNSALTED butter at room temperature
4 cups powdered sugar (see note)
1 teaspoon vanilla
dash salt
5 tablespoons strawberry puree (see note)

Whip the butter, with electric mixer, until light and fluffy. Beat in powdered sugar, one cup at a time, scraping the sides of the bowl occasionally.

Add the strawberry puree (I just pureed fresh strawberries in my food processor), vanilla and salt. Beat till smooth.

NOTE: The liquid of the strawberries will vary for everyone. If your frosting seems too soft, just add extra powdered sugar (a little at a time) until you get the consistency you want.  If you are going to use this for piping trim, you'll have to add at least another cup to a cup and a half of powdered sugar.
NOTE: This recipe will easily frost 2½ dozen cupcakes if you are just frosting them with a knife.

Selasa, 18 Oktober 2011

CLASSIC BUTTER CAKE

A few days ago, my cooking buddy Katy, at Food For a Hungry Soul, posted a great classic cake recipe. It immediately caught my eye, not only because it looked so moist and delicious, but it looked quick, easy and used all standard pantry ingredients (my idea of a great recipe).

The recipe is all I hoped it would be. We had company for the weekend and the cake was a big hit. As a matter of fact, it was gone in about a day and a half (and it makes a nice big cake!!).  I hope you try it, it is delicious, thank you Katy!!

OLD FASHIONED BUTTER CAKE
2 cups all-purpose flour, sifted
1¼ cup sugar
1 tablespoon baking powder
1 teaspoon salt
½ cup butter, softened
1 cup milk
1 teaspoon vanilla extract (I used 2)
2 eggs

Preheat oven to 350*F. Grease and flour two 8" x 2" baking pans and set aside. (see note)

In a large mixing bowl sift together the flour, sugar, baking powder and salt. Add butter, milk, and vanilla. Beat on high speed of an electric mixer for 2 minutes (scrape down the sides of the bowl once in a while). Add the eggs and beat two more minutes.

Pour batter into prepared pans, dividing equally between the pans. Bake 30 to 35 minutes, or until a toothpick inserted into the center comes out clean. Remove from oven.

Cool in the pans for 10 minutes and then turn cakes out onto a cooling rack to cool completely.

Katy frosted her butter cake with a delicious looking chocolate frosting, which I planned on repeating until I discovered I didn’t have enough powdered sugar, so I opted for a cooked frosting that uses granulated sugar, you can find my recipe here.

NOTE: The first time, I made this cake, I made the mistake of not measuring  the depth of my 8” cake pans. Katy’s directions said 8” x 2” and I found out (all too late) that my pans were 8” by 1½”. The cake baked beautifully, but got so tall that it came over the top and flowed over the edges (and down the sides) of the pan (thank goodness I had them on a cookie sheet!!) The next time I made the cake, I used a 9” x 2” pan and it worked beautifully (baked in 30 minutes).

Rabu, 12 Oktober 2011

RASBERRY SHORTBREAD BARS

Everyone loves these raspberry bars, they have an ultra-buttery shortbread crust topped with cooked raspberries and a streusel topping.They are very sweet, buttery, tender AND they cut nicely...perfect for gift giving (these will definitely be in my cookie gift boxes this Christmas). Yes, you heard me correctly...it is never too early to start planning your holiday baking!!.

Raspberries grow well in Alaska, so if you are lucky enough to have some in the freezer, this is a wonderful recipe for them; I'm not so lucky, so I used a 12 ounce bag of frozen raspberries.

Put the berries (no need to thaw) in a heavy saucepan with ¼ cup of water and one cup of white sugar. Bring to a boil over high heat, then reduce the heat to medium high and simmer the berries until they thick (I turned mine down to a medium low heat and simmered them for about 15 minutes). Set aside to cool (they will thicken even more as they cool).
SHORTBREAD CRUST
21 tablespoons of butter, melted and cooled to room temp.
This seems like a lot of butter, but it makes an upper and lower crust
¾ cup of white sugar
2 large egg yolks
3 cups + 3 tablespoons all purpose flour
No need to use an electric mixer, I did it all with a wooden spoon. Mix the sugar into the melted butter and whisk in the egg yolks. Stir in the flour to make a very stiff dough. Remove two cups of this dough and pat evenly into a foil lined 9 x 13 pan. Prick the dough all over with a fork and refrigerate for 30 minutes (or put in freezer for 7 minutes). Set the rest of the dough aside.

Bake the 9 x 13 chilled pan of dough, on the middle rack of your oven, for 20 minutes at 325.
After 20 minutes, the dough will still be very pale in color and will not have any golden color on the edges. Remove it from the oven and spread the cooled raspberry filling evenly over it.

To the reserved shortbread dough that you set aside, add ¼ cup of granulated sugar and use a fork to break up the dough into crumbs (I use my pastry cutter).
Sprinkle the crumbs evenly over the raspberry layer. Bake on the TOP rack of a 350 oven for 25 minutes (mine took 32 minutes). Watch the crumbles towards the end of the baking time so they don't get dark. 

Cool baked bars on a wire rack for at least an hour or until completely firm. You can speed set them in the fridge. When the bottom of the pan is completely cool, lift the bars out of the pan by pulling on the flap ends of the foil. Cut into 2" bars. These will keep at room temperature for a week.

 NOTE: The butter measurement of 21 tablespoons is not a typing error
NOTE: Line  your 9" x 13" baking pan with foil and leave the ends of the foil a little long, so you can use them as handles to lift the cooled bars out of the pan. You don't have to grease the bottom of the pan because there's so much butter in the shortbread, but DO spray the sides of the pan/foil with cooking spray so the jam doesn't stick to the sides.

NOTE:
Pay attention to baking temperatures. The first crust pre-bake is on the middle rack at 325. The final bake is on the TOP rack at 350. The recipe says it is baked on the top rack so that the bottom of the crust doesn't get too dark.


NOTE: If you want to take a shortcut, I am fairly certain you can just use raspberry jam instead of cooking the berries. I have not tried it this way, but I don't know why it wouldn't work (although I'm fairly certain that the cooked berries taste "brighter".

Kamis, 06 Oktober 2011

MAPLE PEANUT BUTTER FUDGE (MICROWAVE)

I found this recipe on one of my favorite recipe pages: The Domestic Mama and; The Village Cook. I have found some great recipes over there, and I highly recommend their recipe blog.

This quick and easy microwave fudge is totally addicting. I made it the other day and our company went nuts for it (I have to admit that Picky-Picky Hubby and I ate our share as well). The unlikely maple-peanut butter combo is fantastic; not quite peanut butter, not quite maple, hint of butterscotch maybe?


8 ounces salted butter
1 cup creamy peanut butter
1 pound of powdered sugar
1/4 teaspoon salt
1 1/2 teaspoons maple extract
1 teaspoon vanilla extract

Line an 8" x 8" buttered pan with parchment paper so that the parchment overhangs enough to fold over, once the pan is filled (I didn't butter the pan).

Place the butter and peanut butter in a large (microwave safe) bowl; cover with plastic wrap. Microwave on high for 2 minutes (cut the butter into cubes and mix it into the peanut butter so that it all melts evenly).

Remove the bowl from the microwave (carefully, it is hot), and stir. Re-cover and microwave for (an additional) 2 minutes. Remove from microwave (careful, it is really hot) (watch for hot steam when you remove plastic).

Add the extracts and powdered sugar and stir with wooden spoon (I used my stand mixer). Press into prepared pan and press down until flat and compact. Cover the top of the fudge with extra parchment paper. Place in fridge for 2 to 4 hours.  Bring to room temperature before you try to slice this fudge. I didn't butter the pan, so I had to run a thin knife around the edges before I lifted the fudge out of the pan by using the parchment paper "handles".

Store in air tight container at room temperature. I didn't put mine in an air tight container, I just left it in a bowl with loose fitting lid.

NOTE: If the fudge seems "crumbly" while it is still hot, don't worry about it. Just press it tightly into the prepared pan and when it chills, it will look just like the photo. Eight ounces of butter seems like a lot, but I can guarantee you the fudge does NOT taste greasy at all, it is excellent.

Sabtu, 01 Oktober 2011

APPLE CAKE with CARAMEL SAUCE

My Facebook friends are "torturing" me with tales of inexpensive produce this time of year...bushels of tomatoes equaling 14 quarts of fresh salsa...bushels of apples and peaches (I am so envious). The other day (here in Alaska) I paid $2.29 a pound for apples!! Whew!!!

I found this recipe for apple cake on Recipe Shoebox, it is the ultimate as far as flavor and moistness. It is one of those gem-recipes that is even more moist on the second day. Served alone it is sensational, but served slightly warm with ice cream, it is ridiculously delicious.


5 large Granny Smith apples
½ cup butter (room temperature)
2 cups granulated sugar
2 eggs
1 teaspoon vanilla extract
2 cups all purpose flour
1½ teaspoons ground cinnamon
½ teaspoon ground nutmeg
½ teaspoon salt
1 teaspoon baking soda

Peel, core and dice the apples (about pea size...I use the food processor), set aside. With an electric mixer, cream the butter and sugar until light and fluffy.  Add eggs, one at a time, beating well after each egg; beat in vanilla.

Add flour, spices, salt and baking soda to the butter mixture. The batter will be very thick (almost like a cookie batter). Stir in the apples (the moisture from the apples will loosen up the batter).

Spread the batter into a greased 9" x 13" baking dish (I like to use glass) and bake at 350 for 40 to 45 minutes or until the top is golden brown and springs back when lightly touched (my electric oven takes 45 minutes).

Lara's original recipe just said to serve the sauce (recipe below) with the cake, however, I decided to do it a little differently: I removed the cake from oven and let it cool for 15 minutes, then I poked small holes, about every 2", over the entire cake  (make sure the holes go deep enough to touch the bottom of the cake pan). NOTE: I used my skinniest meat thermometer to make the small holes.  Pour the hot caramel topping over the surface of the cake (it will disappear down into the holes).

EASY CARAMEL TOPPING (Lara called it butterscotch, but it is more of a caramel taste).
In a sauce pan with a heavy bottom, mix ¼ cup butter and ½ cup brown sugar. Cook over medium heat until the butter is melted completely. Slowly add ½ cup heavy cream (careful it will splatter at first) whisking while you add it.  Bring this mixture to a LOW boil.  Boil and stir for 3 minutes. Pour hot topping over warm cake. Let cake cool before serving.

Selasa, 27 September 2011

BEST APPLE PIE EVER !!!

I've made a zillion apple pies in my life that I thought were pretty good. However, the following recipe is new to me, and I have to tell you it is the absolute BEST apple pie I've EVER tasted.
Sorry about this photo, I cut the pie when it was still too hot

When I served this pie to Picky-Picky husband and guests, no one spoke. All I heard were forks clicking on the plates, and the muffled sounds of "oooohhhh man!!"  and "Mmmmmmm"  (a good sign). The first servings of pie were followed quickly by second servings and comments like "wow, that's good".  I totally agree!!!
Double 9" pie crust
6 large Granny Smith apples
½ cup butter
3 tablespoons flour
1 tablespoon corn starch
¾ cup brown sugar
¾ cup granulated sugar
1 teaspoon ground cinnamon
¼ teaspoon ground nutmeg
1 tablespoon vanilla extract + enough water to = ¼ cup

Peel and thinly slice the apples. Place them in the bottom half of the pie crust. NOTE: It is important that you use a DEEP dish pie plate or you will get spill over.

In a heavy bottomed sauce pan, melt the butter. Add the flour and corn starch and stir until smooth.  Measure 1 tablespoon of vanilla extract into a quarter cup measure, and then fill the rest up with water (total liquid ¼ cup). Add the liquid, brown sugar, granulated sugar, cinnamon and nutmeg to the melted butter. Bring to a low boil (actually not a boil...just let it start to boil around the edges of the pan for about 30 seconds.

Take off the heat and pour over the apples.  Put on the top crust. Pinch the edges shut and cut some vent holes in the top crust.  Brush the top pie crust with beaten egg whites and sprinkle with granulated sugar.

Place pie on a baking sheet (in case it spills over), and bake in PREHEATED 400 degree oven for 1 hour or until apples are tender. Let cool until you can hold your hand (comfortably) on the bottom of the pie plate before cutting.

The pie tastes almost like a mellow caramel apple, it is beyond good!!

Jumat, 23 September 2011

CROISSANT PEACH BREAD PUDDING and BUTTER RUM SAUCE

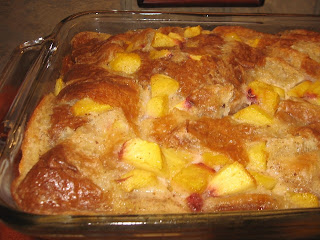
OK, this dessert is SERIOUSLY delicious and definitely not for the calorie shy. It makes a nice big bread pudding and yet it lasted only one evening (thank goodness we had company). It is a creamy, custard-y (but not heavy) bread pudding made with croissants and fresh peaches.  As if that weren't good enough, it is topped with the most delicious butter rum sauce you can imagine.
4  large (day old) croissants
3 large (ripe) peaches, peeled and diced
(1) 14 ounce can sweetened condensed milk (not evaporated)
3 large whole eggs + 3 egg yolks (well beaten)
1¼ cups hot milk
¼ cup butter melted
1 teaspoon ground cinnamon
1 teaspoon vanilla extract

Whisk everything together except the croissants and peaches. Once mixed well, stir in the peaches. Tear the croissants into 1" pieces and add them to the mixture (stir ever so gently, just to moisten...be careful you don't turn the croissants into "mush").

Pour the mixture into a greased 8" x 11" baking dish. Bake in a preheated 325 oven for 50 to 60 minutes (my oven took 55 minutes). A knife inserted in the center of the bread pudding will come out clean when the bread pudding is done. Let bead pudding cool for about half hour before serving (or serve it chilled). Top with warm butter rum sauce. Refrigerate any leftovers.


BUTTER RUM SAUCE

½ cup brown sugar
½ cup butter
2 tablespoons light corn syrup
1 tablespoon rum (I use 1 teaspoon rum extract)

While bread pudding is baking, Mix the brown sugar, butter and corn syrup in a heavy bottomed sauce pan and bring to a boil. Immediately turn heat down so that the sauce just simmers around the edges and simmer for 1 or 2 minutes (mine was done in 1 minute) or until it is just slightly thickened. Remove from heat and mix in the rum (or rum extract). Let the sauce cool a little before you use it.
 
NOTE: As the butter rum sauce cools to room temperature (which takes quite a while), the butter may separate from the sauce. If it does, just heat it up a little and whisk it again (it will go back together).

Senin, 19 September 2011

CRUSTLESS CRANBERRY-WALNUT PIE


This is a very old (and wonderful) recipe. It is called a pie, although I would say it is a cross between a pie and a cake...(a little more like pie than cake, if that makes sense). It goes together in just a couple of minutes with a bowl and spoon. I serve it while still warm with a scoop of vanilla ice cream and company gobbles it up....it is the perfect balance of flavors, not too sweet and not too tart. Our son is NOT a cranberry fan, but he loves this dessert.

1 cup all purpose flour
1 cup granulated sugar
¼ teaspoon table salt
2 cups fresh cranberries (I use frozen)
½ cup chopped walnuts
½ cup butter, melted
2 large eggs
1 teaspoon almond extract (don't leave out)
1 teaspoon vanilla extract
½ teaspoon ground cinnamon

 
Preheat your oven to 350 and spray a 9" pie plate with vegetable spray, set aside.

In a large bowl, mix the flour, sugar and salt. Add the walnuts and gently toss to coat the fruit and nuts (this will keep them from sinking in the batter as it bakes).

Whisk the eggs, melted butter, cinnamon, almond extract and vanilla extract together until smooth. Pour over the dry ingredients and mix with a spoon. NOTE: The batter is almost as thick as cookie dough, so I use my hands to mix gently.

Spread into prepared pie plate and bake at 350 for 40 to 50 minutes, or until a toothpick inserted in the center comes out clean. NOTE: I used frozen cranberries (no need to thaw), so it took about 48 minutes to bake in my oven. It slices beautifully like a pie.


Senin, 12 September 2011

CLASSIC APPLESAUCE CUPCAKES

I have been making these cupcakes for my kids since they were little. They all have teenagers of their own now, so, lets just say the recipe has been in our family a while. It is a simple, one bowl recipe, that produces a moist and flavorful cupcake in short order.

NOTE: Baking times for using this recipe in a 9" x 13" pan, a 9" square pan, or (2) 8" or 9" layers and cupcakes are at the bottom of this post.

2½ cups all purpose flour
2 cups sugar
1½ teaspoons baking soda
¼ teaspoon baking powder
1½ teaspoons salt
¾ teaspoon ground cinnamon
½ teaspoon ground cloves
½ teaspoon allspice
1½ cups applesauce
½ cup water (I use apple juice)
½ cup shortening (I use butter flavored)
2 eggs
1 cup raisins (I use golden)
½ cup chopped walnuts

Beat all ingredients (except raisins and nuts) in a large bowl with an electric mixer (on low) for 30 seconds, scraping sides of bowl. Then beat on high for 3 minutes. Stir in raisins and nuts and pour into greased and floured pans. It is just that quick and easy!!
NOTE: If you want to make half of this recipe (my mother used to call them "snack cakes"), just cut the recipe in half and bake it in a 9" square pan.

BAKING TIMES
9" x 13" pan = bake for 60 to 65 minutes
(2) 8" or 9" layers  = bake for 50 to 55 minutes
9" x 9" snack cake = 50 to 55 minutes
cupcakes = 20 minutes  (makes 3 dozen)

A toothpick, inserted in baked cake should come out clean when the cakes are done.
 
Copyright (c) 2010 minola. Design by WPThemes Expert

Themes By Buy My Themes And Web Hosting Reviews.